
Want to create or adapt books like this? Learn more about how Pressbooks supports open publishing practices.
Working with Video (Kaltura, Canvas, Zoom, and PowerPoint)

Recording an individual or group presentation with PowerPoint 365 or 2019
These instructions are for Office 365 or Office 2019 for Windows . You can download Office 365 from IUWare for free . Office 2019 is available on all computer lab Windows computers and via IUAnyWare . (Review instructions on setting up and using IUAnyWare .)
If you are using a Mac
If you are using the latest version of Office 365, you can export a presentation narrated in Slide Show as a video file which can then be submitted as a previously recorded video . Note that when you export your presentation as a video, any narrated audio that was recorded in Slide Show will play, but other embedded media files will not play.
You can also record audio onto slides in Keynote and export them to a QuickTime .mov file which can then be submitted as a previously recorded video .
Video Walkthrough
The following video contains captions that you can turn on using the CC button at the bottom right of the video player.
Instructions
The following steps presume you have Office 365 or 2019 on a Windows computer.
- The Recording tab does not appear on the Ribbon in PowerPoint 365 or 2019 by default so you may need to enable it. Go to File > Options and choose “Customize Ribbon.”
- On the right side list of Main Tabs scroll down to Recording, check the box next to it, and select “OK.”

- Check and make sure your microphone and webcam (if using) are recording properly by selecting the small microphone and video camera icons at the bottom right of the recording screen.
- Select the red “Record” button at the top left to start. You can stop after each slide and review your recording or you can continue through the whole presentation. If you continue, make sure to pause between slides. The 1-2 seconds of silence allows PowerPoint to tell what audio goes with what slide.
- When you are done, select the “X” at the top right to finish.

- Select the quality you would like the video to be (1080p (the default) is fine) and leave “Use Recorded Timings and Narrations ” selected.
- Select “Create video” and tell PowerPoint where to save your video file. The small black status bar at the bottom of PowerPoint will show you the progress of your export. Do not do anything else in PowerPoint while a video is processing or it will cancel the job.
- Once the video has been processed, you are ready to upload your video to Kaltura and submit. Visit submitting a previously recorded video for instructions.
Group Recording with PowerPoint
If your group prefers to record the individual sections independently and at least one person has Office 365 or 2019 or can access it at a computer lab, you can compile your separate recordings in PowerPoint. Each person in the group would
- begin with a copy of the master PowerPoint file,
- delete the slides that they are not responsible for recording,
- record their audio and/or video on their slides only, and
- send the file with their recorded slides to the group member responsible for putting together the slide deck.
The person putting the slides together would add the other members’ slides into their PowerPoint file and export it to video.
Recording tips
- Team members using Powerpoint for Mac or an older version of PowerPoint for Windows can record audio onto their slides by using the “Audio” option on the “Add” tab on the Ribbon. To do this,
- open your PowerPoint file in the version of PowerPoint that you have
- go to the Insert tab,
- select the Audio button and choose “Record audio”
- Starting from the same PowerPoint file is very helpful for the person who is compiling the recorded slides.
- After your video is created, the person who will submit the assignment for the group will upload the video file to their Kaltura account.
Submit Your Assignment
Visit Upload a previously recorded video for instructions on adding your video to Kaltura. Then, based on your instructor’s instructions, submit your video in one of the two following ways.
- Submit your video by embedding it in a text box in an Assignment or Discussion .
- Submit your video by adding it to the Kaltura: Media Gallery for your course
Verify the Automatic Captions on Your Video
All video uploaded to Kaltura is automatically mechanically captioned using speech-to-text technology. If you’ve ever used speech-to-text, you know it’s never 100% accurate so you need to check your captions and edit as needed to make sure they are correct and not saying anything embarrassing. The mechanical captions appear fairly quickly on short videos once they’re uploaded. You can check them either in Kaltura: My Media if it is available in your course, or at Kaltura Mediaspace. Instructions on checking and editing your captions are at Accessible Videos in this book.
Note on Video Processing
When a video is first uploaded to Kaltura you will have a “media is being processed” animation where you expect your video to be.
Please be patient. Processing time depends on the length of the video and the number of other videos Kaltura is processing. It will appear once it has completed processing, though you may need to refresh your page. You can embed a video that is still processing in Kaltura .
A Canvas Semester Checklist Copyright © by Trustees of Indiana University is licensed under a Creative Commons Attribution-NonCommercial-ShareAlike 4.0 International License , except where otherwise noted.
1.858.217.5144
Start your project
What is the process for recording a presentation in PowerPoint?
Recording a presentation in PowerPoint enables you to capture voice narration, slide timings, and more. Here’s a step-by-step guide on how to do it:
- Open the PowerPoint presentation you want to record.
- Navigate to the “Slide Show” tab in the PowerPoint toolbar.
- Click on “Record Slide Show” in the Set Up group. You have two options: either start recording from the current slide or from the beginning of your presentation.
- A recording window will open, and you can choose to turn on/off the microphone or camera icons depending on whether you want to capture audio or video narration.
- Click “Record” to start. PowerPoint will count down from 3 before starting.
- As you go through your presentation, you can use the controls at the bottom left of the screen to navigate between slides, stop and start recording, and use the pen tool to highlight or annotate parts of your presentation.
- When you’re done, click “Stop” to end your recording.
- Once the recording is done, you can preview it by clicking “Play.” If you’re not satisfied, you can always click “Clear” to start over.
- If you’re happy with your recording, just close the recording window. Your recorded slide show will automatically save with your presentation.
You can also add specific timings or narrations to specific slides by choosing “Record from Current Slide” in step 3. You can then choose the slide you want to start from and repeat the recording process for that slide.
This feature comes in handy when creating webinars, online courses, or any presentation where you want to add a personal touch with your own voice and video narration. Remember, to ensure the best quality, use a good microphone and ensure your environment is quiet during the recording.
View Our Presentation Portfolio
- How can retail sales teams leverage collaboration tools to boost investor relations and craft impactful client presentations?
- How can retail executives boost stakeholder engagement with interactive visuals in remote corporate presentations?
View our presentation portfolio
Aflac insurance, adidas apparel manufacturing retail, nascar gaming & entertainment sports & sporting goods, medtronic healthcare & medical manufacturing technology & software, lenovo manufacturing marketing & advertising technology & software, deloitte finance & investments business solutions, american airlines aerospace, autodesk technology & software business software-b2b, conair household products & services, discovery film & television.
Ready to kick off your project?
Fill out the form below to speak with a SlideGenius representative.
Company size None 1 2-10 10-100 100-1000 1000+
Home Blog PowerPoint Tutorials How to Record a Presentation in PowerPoint
How to Record a Presentation in PowerPoint
Recording PowerPoint presentations can have several benefits. They can serve as recordings of a session that can be uploaded online, shared with participants who might not be able to attend a presentation session, or used as tutorials for passing on instructions.
How to Record a PowerPoint Presentation
PowerPoint provides multiple options for initiating recording for a presentation. You can also choose to record audio and yourself presenting the slides using your camera. When recording your presentations, you can choose PowerPoint templates or something minimalist made by you to record the session. Just be mindful of the graphics to ensure the video does not appear overpowering to the viewer.
How do I Record a PowerPoint Presentation as a Video?
You can start recording your presentation using the following method.
- Record Tab: To record a PowerPoint presentation, go to the Record tab and select whether you wish to record from the beginning, from the current slide, a specific area on the screen, or record audio.
- Slide Show Tab: you can also initiate recording a PPT via Slide Show -> Record to initiate recording from the current slide or the beginning of your presentation.
Record Button: If you’re using the latest version of PowerPoint, you can start Recording your presentation from the current slide via the Record button in the top right corner.
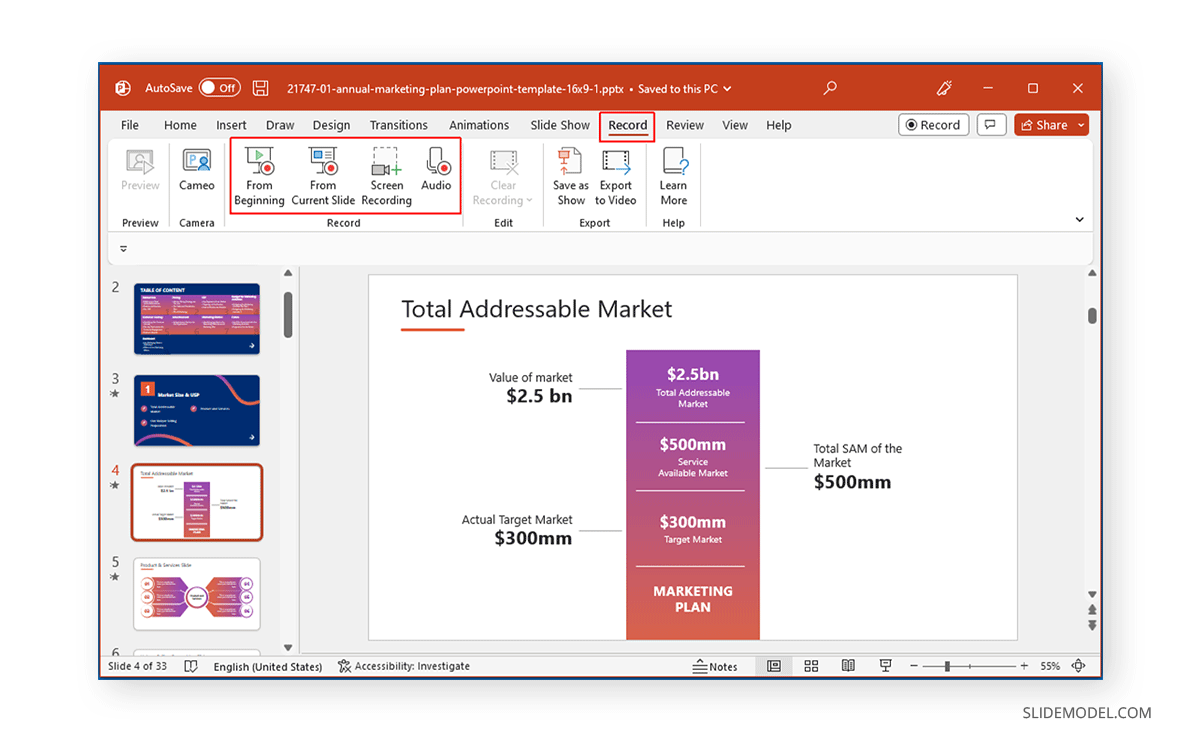
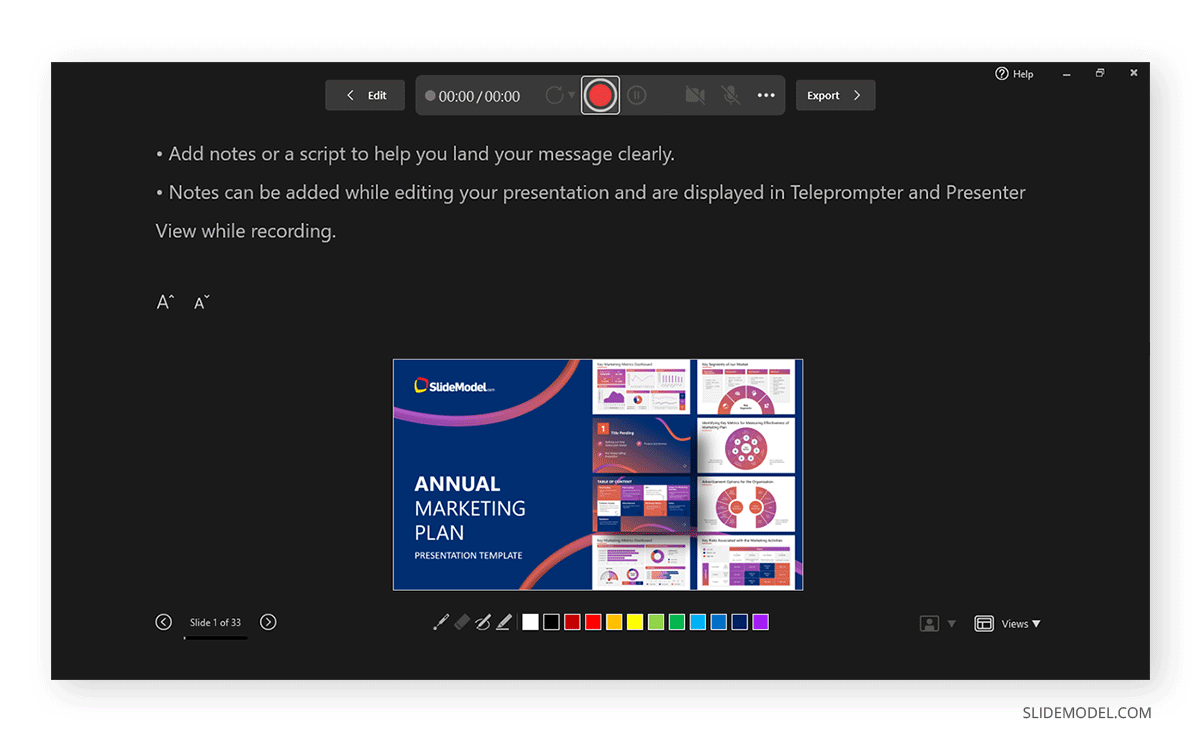
Record from the Current Slide or Beginning of the Presentation
Starting your recording from the beginning of the current slide will open your presentation in recording mode. Hit Record to start the recording.

Screen Recording in PowerPoint
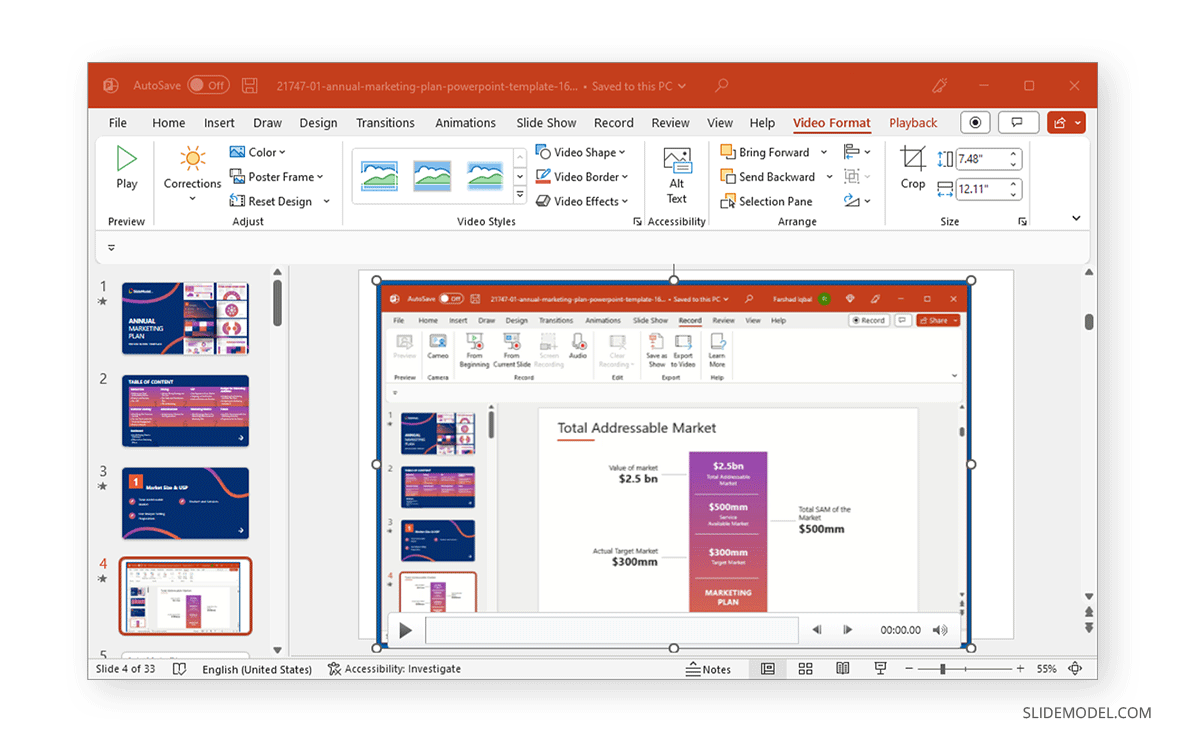
If you initiate screen recording in PowerPoint, you can start recording a screencast by selecting the area you wish to record. This is similar to recording a PowerPoint presentation as a video, with the added advantage of recording other parts of your desktop. This method can also be used for recording a screencast, even if you’re not using a PowerPoint presentation in your video recording.
To start the recording, click Record or use the Windows+SHIFT+R hotkey. To stop the screen recording, click Pause to temporarily halt the recording to resume later or Stop or the Windows+SHIFT+Q hotkey to end the recording session.
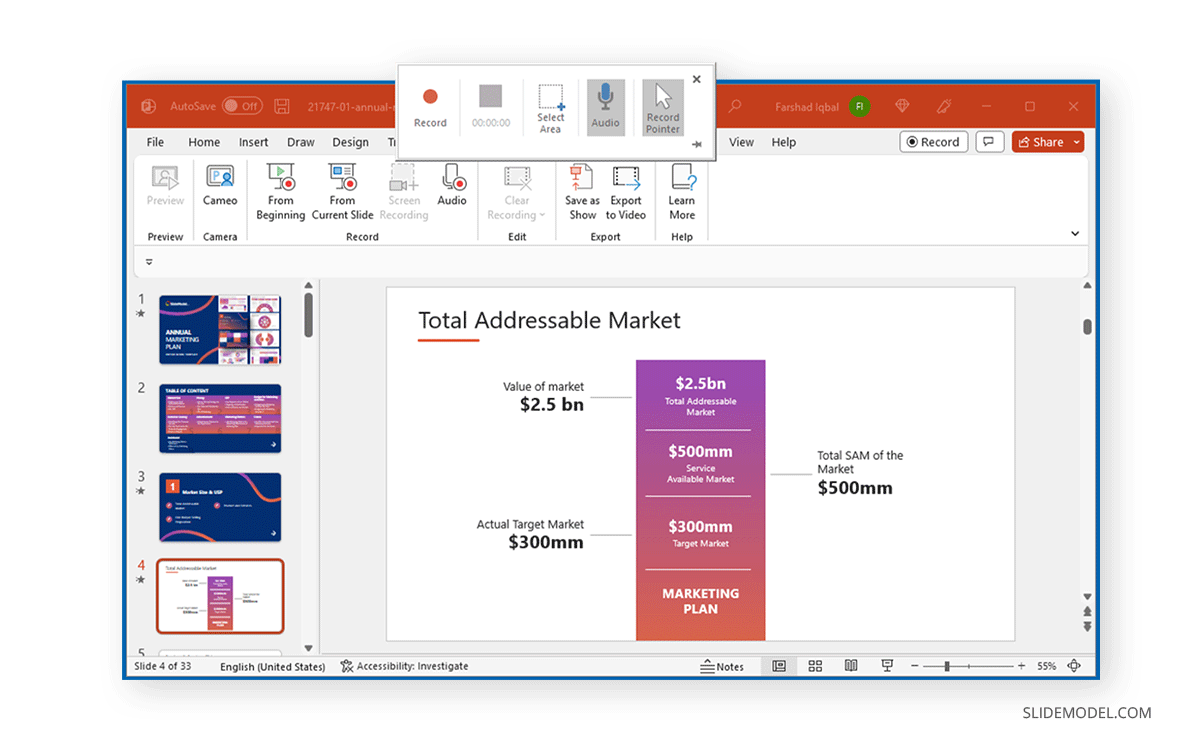
The recorded video will be instantly added to your slide once you click Stop .
Record Audio
Another option in the Record tab in PowerPoint is to record audio narrations for your PowerPoint presentation. Simply click Record to start, Pause to temporarily halt, and Stop to stop the recording process.
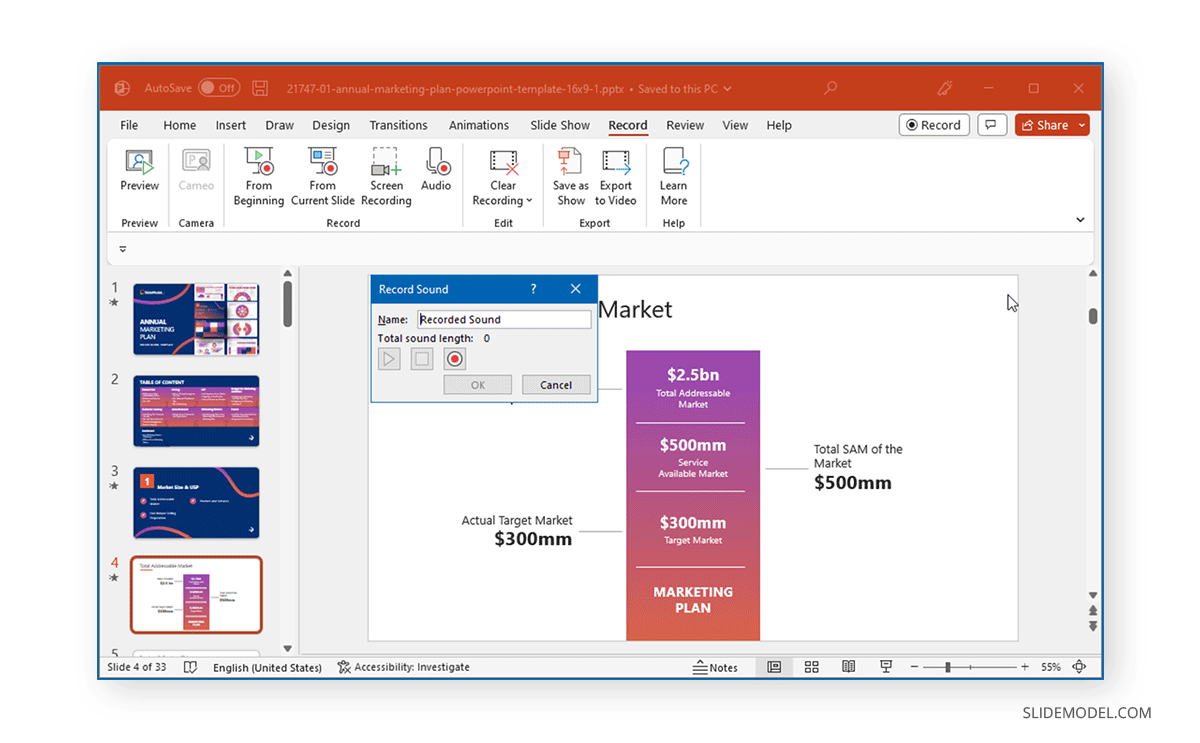
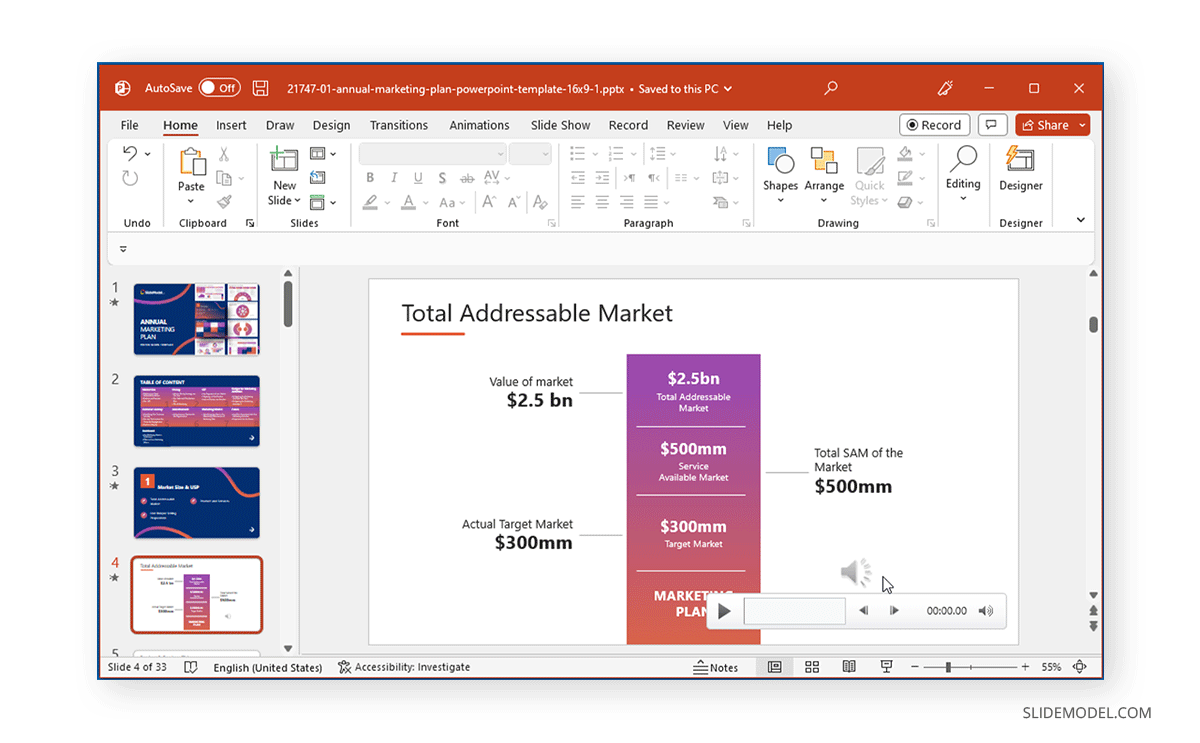
Once the recording stops, the audio will be added to your PowerPoint presentation.
How can I Annotate Slides in PowerPoint During a Recording?
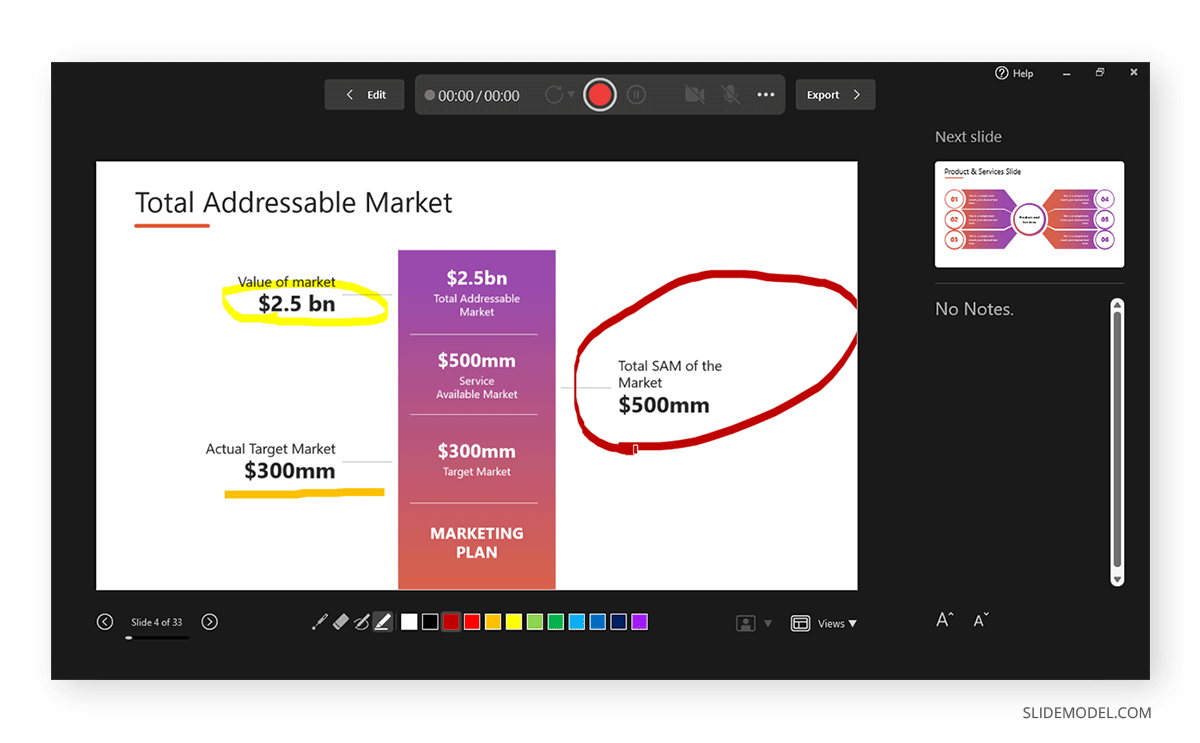
Once you enter recording mode, you can start annotating your slides using the Pen or Highlighter tool. Other tools in the menu include a Laser pointer and Eraser.
How can I Record a PowerPoint Presentation with Audio?
To enable audio for your Powerpoint recording, unmute the mic from the audio icon on top, CTRL+M hotkey, or click the three dots ( More options for recording menu), followed by the Microphone to select the audio device for recording. You can only record audio if an audio device is connected to your computer. This is a fairly simple process, unlike other presentation platforms. For example, in an earlier article, we showed you how to do a voiceover on Google Slides , which entails a slightly more elaborate process.
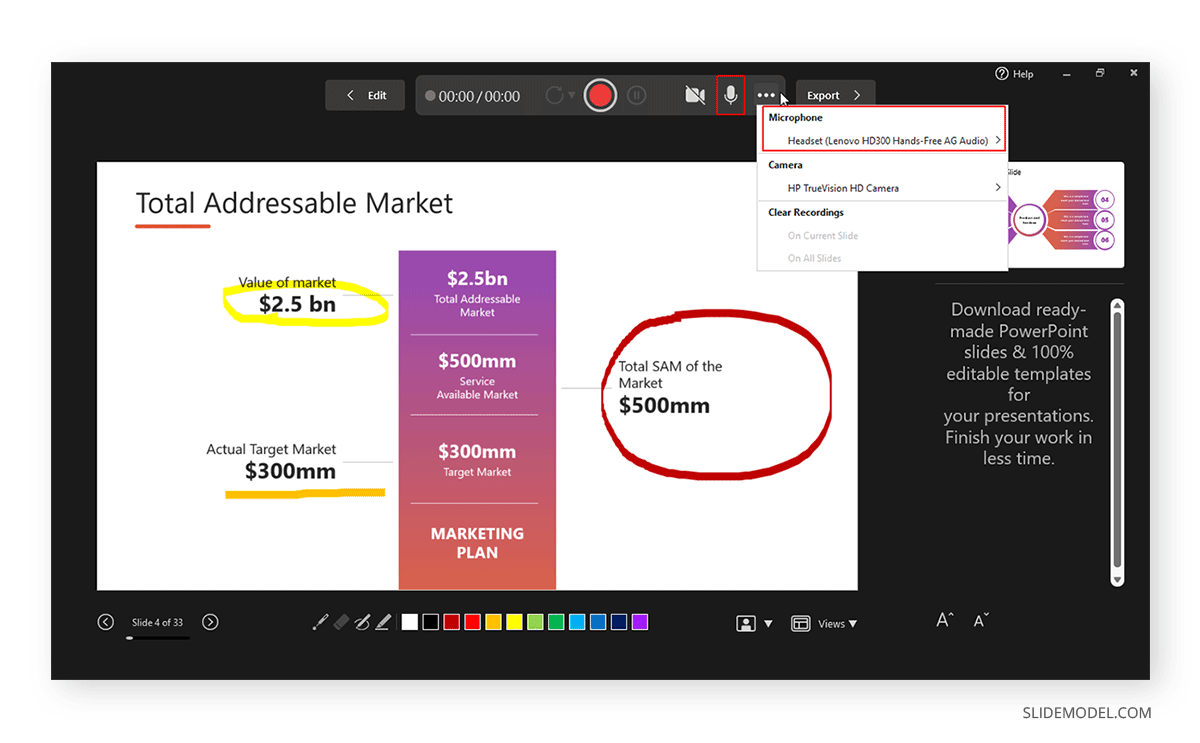
How to Record Yourself Presenting a PowerPoint?
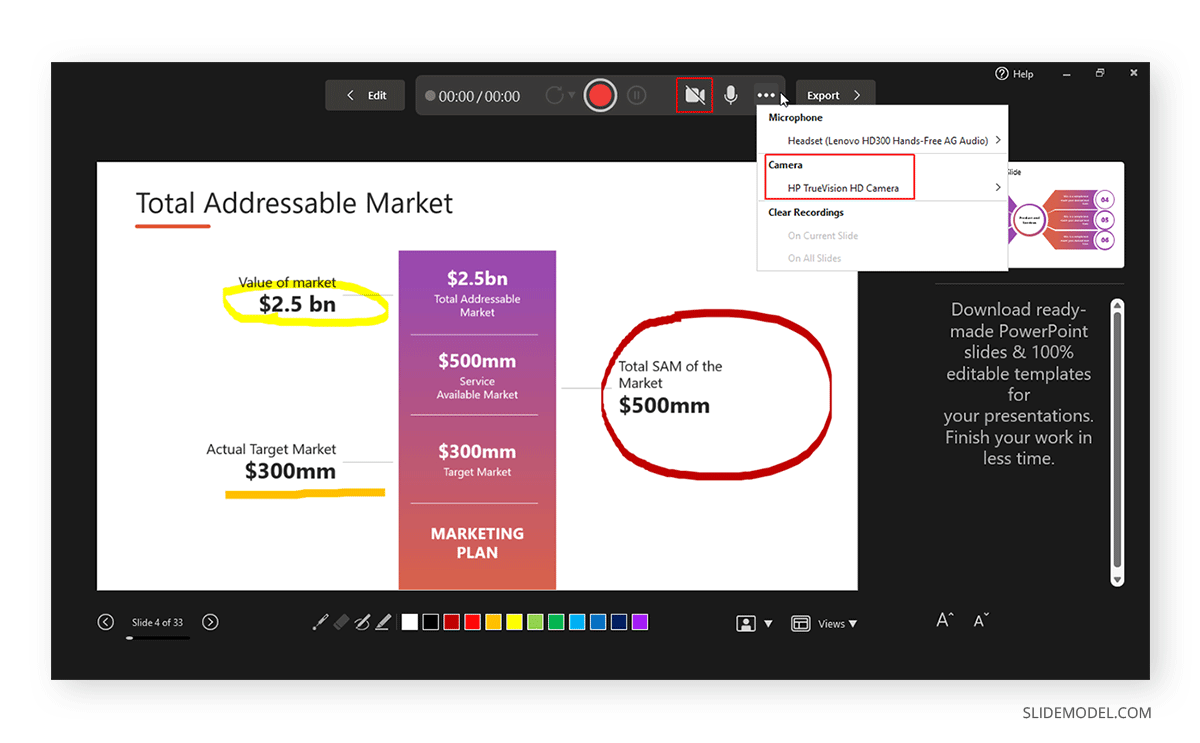
Enable the camera during a recording session.
Like turning on audio, you can toggle the camera on or off using the icon on top. The camera input device can also be selected via the Camera option or CTRL+K hotkey, which can be revealed via the three dots from the top menu.
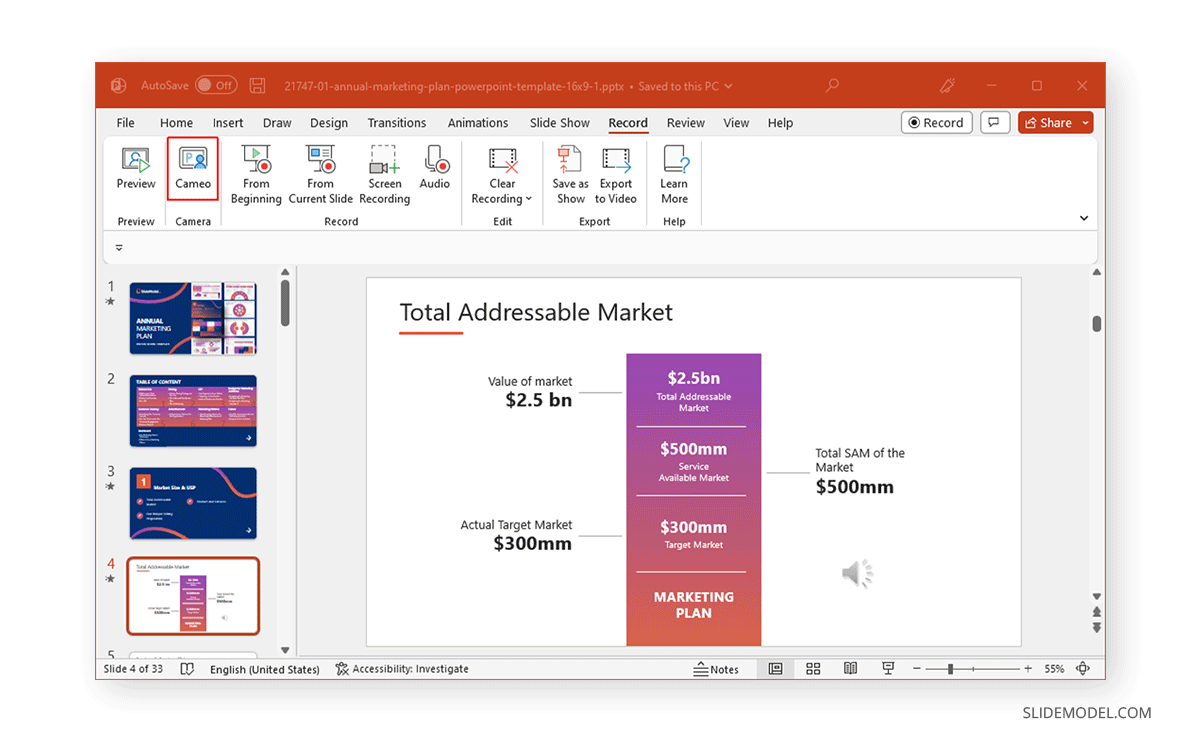
Insert Video Recording in a Slide using Cameo
PowerPoint’s Cameo feature enables recording a video to insert in a slide. You can use the feature to quickly insert a video message in your slides that can be played during a presentation session. This option might also be relevant if you intend to convert PowerPoint to video . If you are looking how to video record yourself presenting a PowerPoint, then follow the steps below.
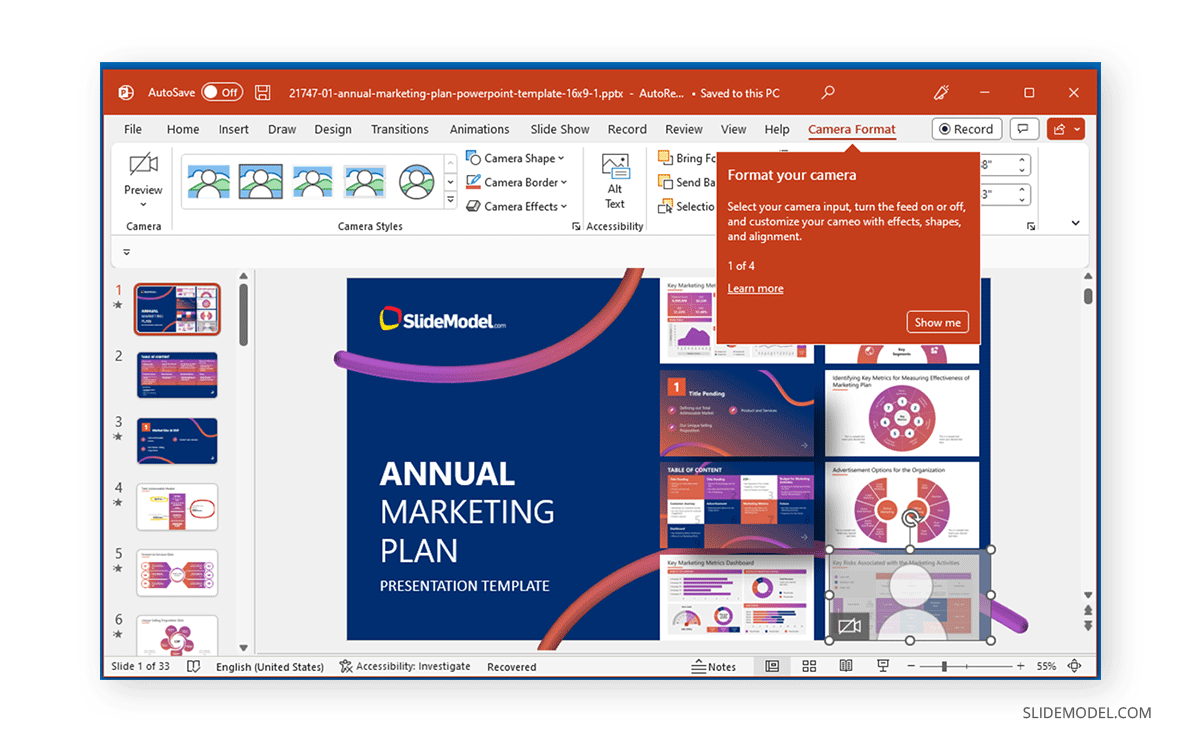
Once Cameo is turned on, you can also choose to stylize the camera shape, style, border, and add effects. Cameo is quite a unique feature in PowerPoint that currently does not have alternatives in rival presentation apps. For example, you cannot use a similar feature if you wish to convert Google Slides to video .
How to Save Recording for a PowerPoint Presentation?
After you have completed your recording, click Export to save the presentation recording.
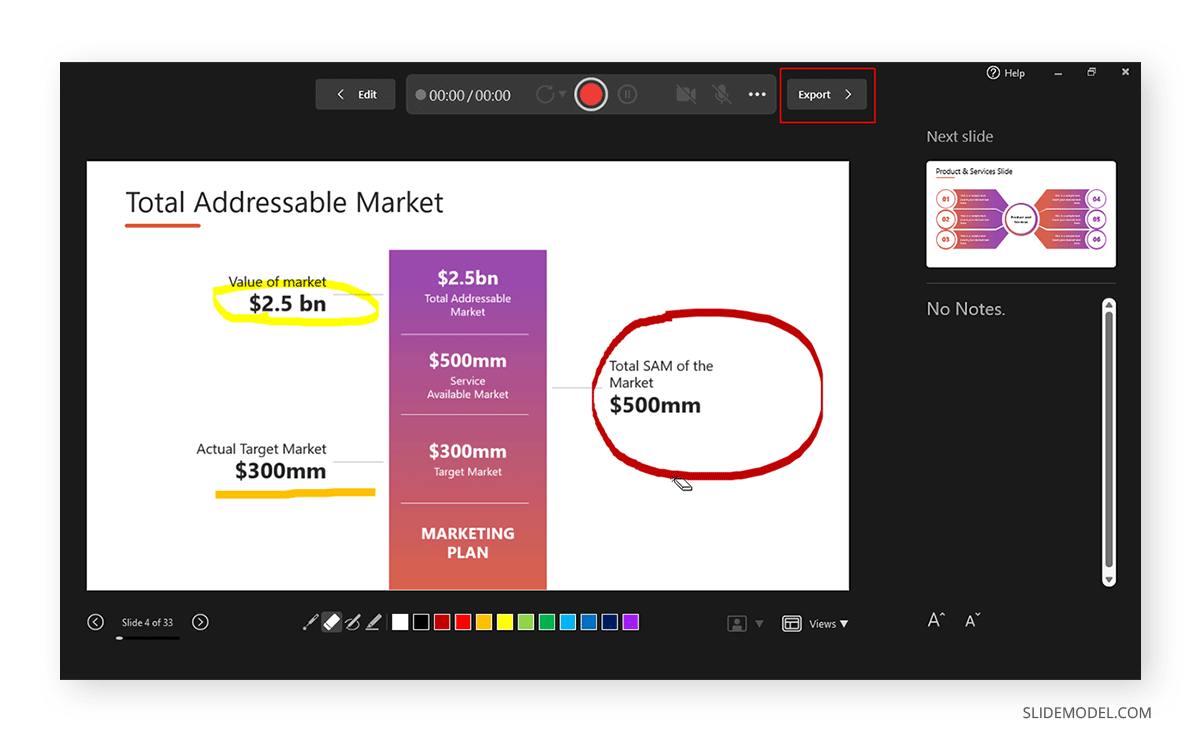
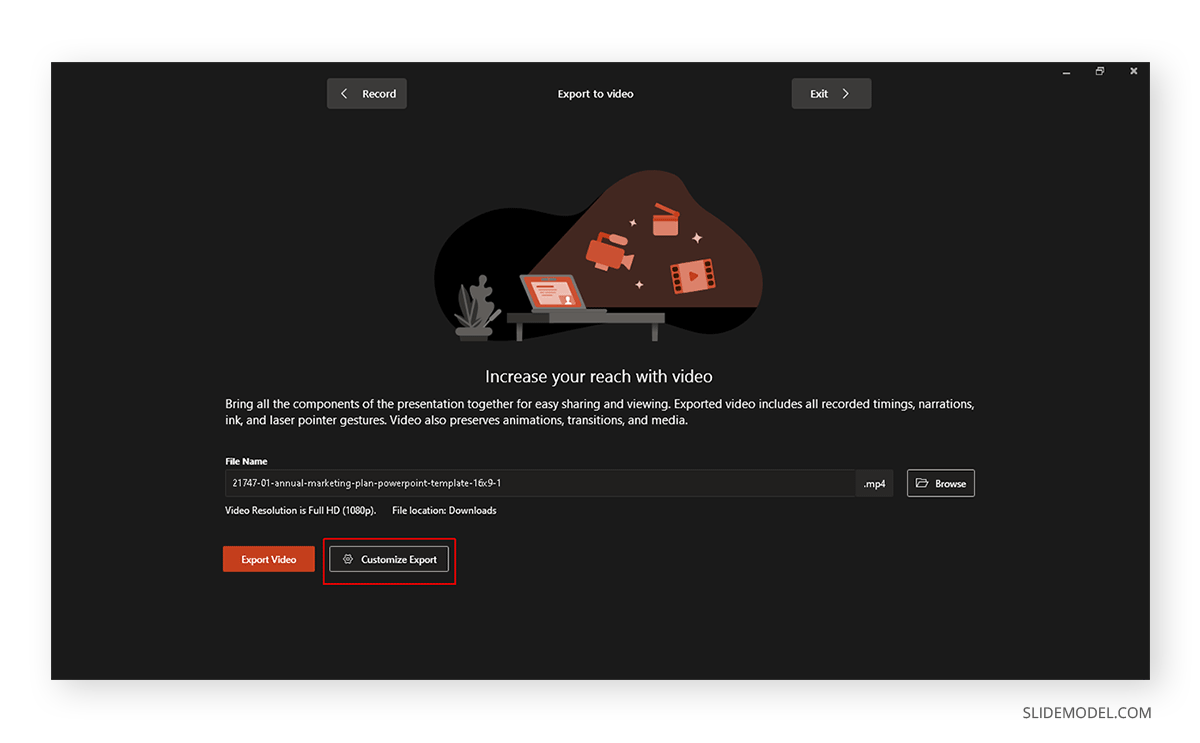
You can customize your recording settings via Customize Export or continue the process via Export Video .
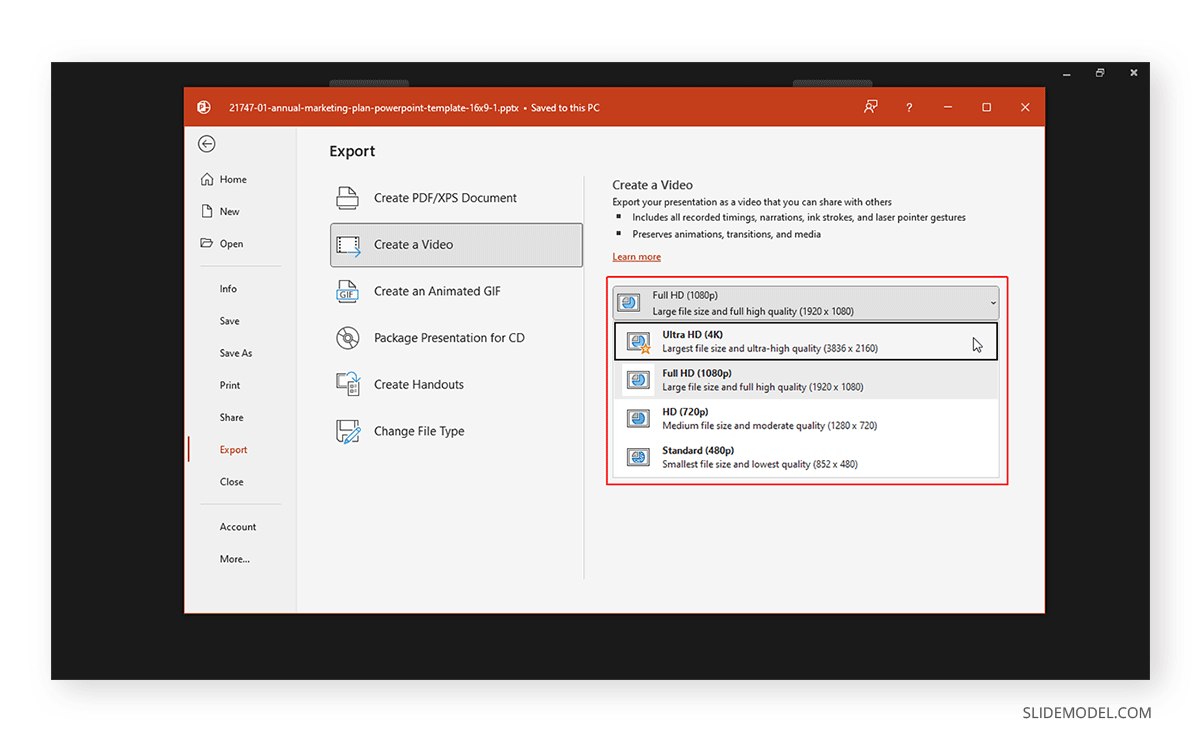
Using the Customize Export option, you can choose between a desired output quality for your video, including Ultra HD (4K), Full HD (1080p), HD (720p), and Standard (480p).
Other options in the menu include the ability to choose and preview timings and narrations.
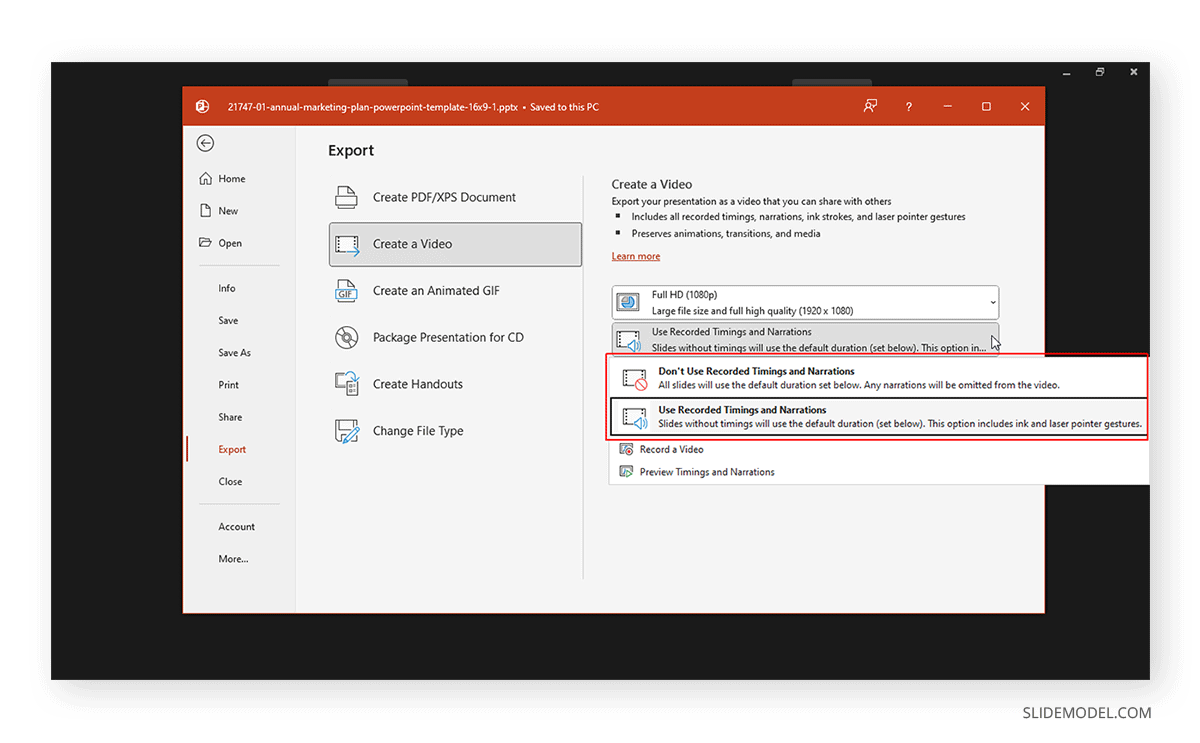
After you are satisfied with your recording settings, you can export your presentation to video.
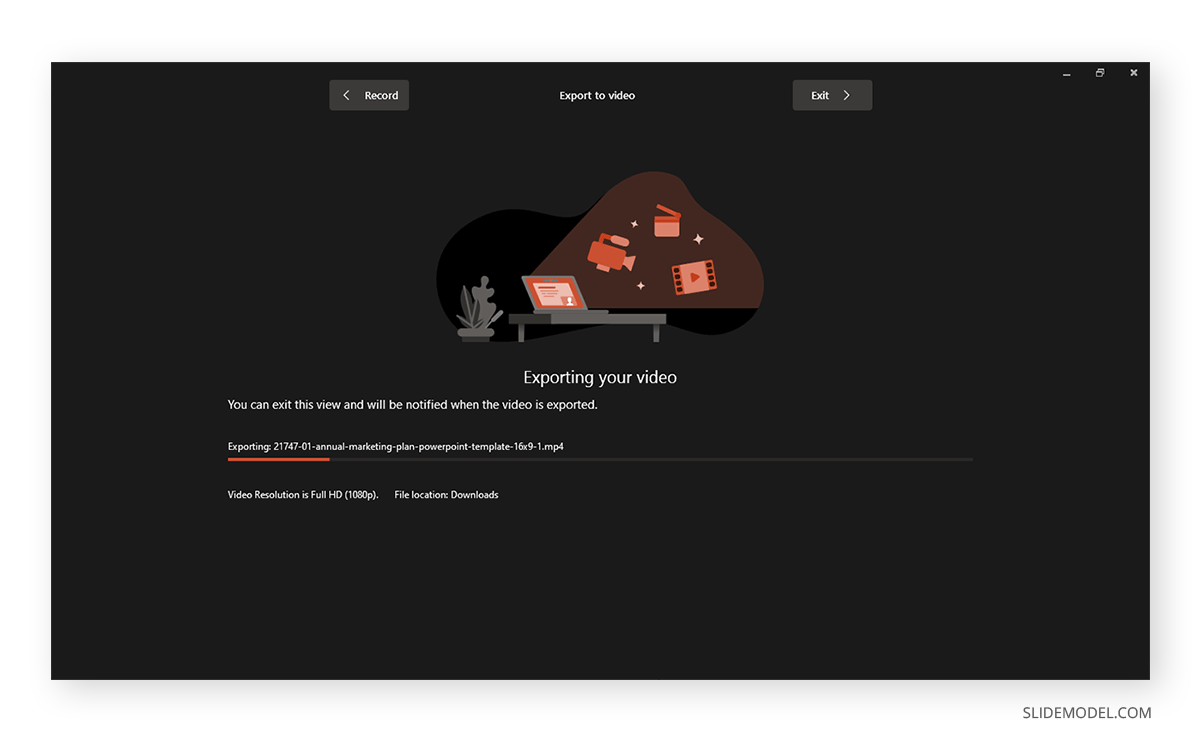
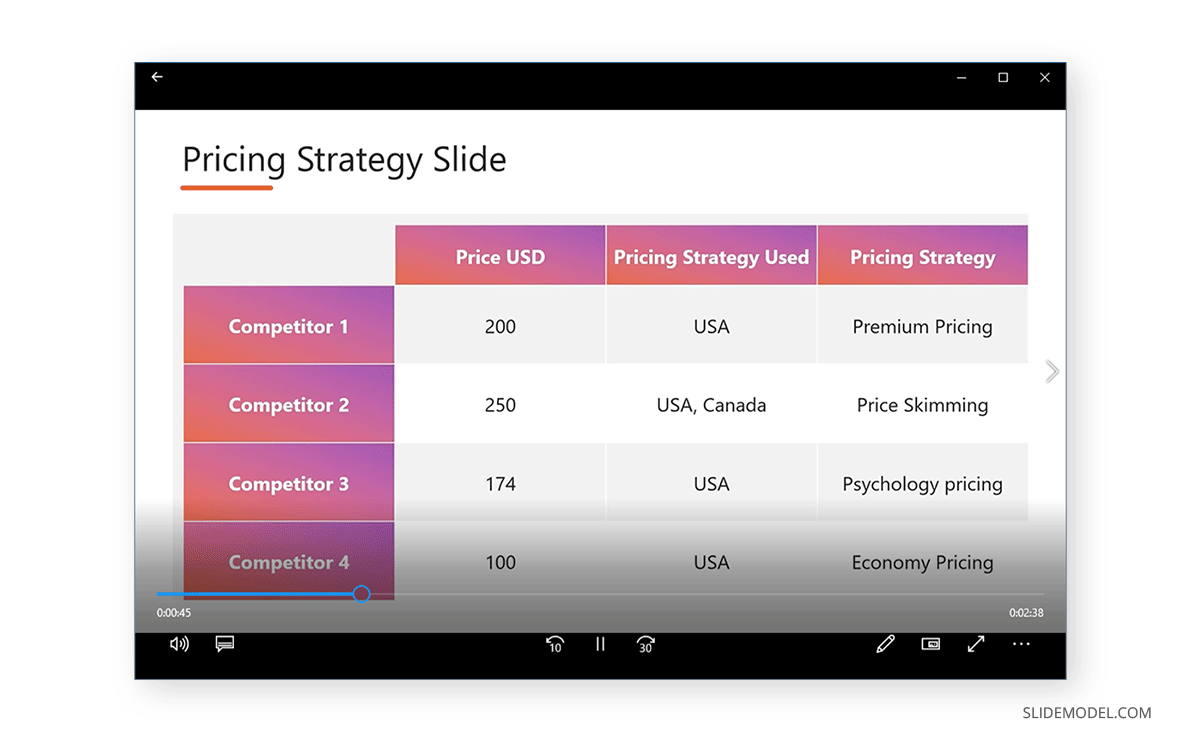
The video recording of your PowerPoint presentation can be played using any standard video player. The video can also be embedded in PowerPoint slides, uploaded online, such as to a YouTube channel, or shared via cloud storage apps like Dropbox, Box, OneDrive, etc.
You can start recording a PowerPoint presentation using one of the following methods: – Record Tab: Go to the Record tab and select whether to record from the beginning, from the current slide, or from a specific area on the screen. – Slide Show Tab: Go to Slide Show > Record to initiate recording from the current slide or the beginning of your presentation. – Record Button: If you are using the latest version of PowerPoint, you can start recording from the current slide by clicking the Record button in the top right corner.
To record audio: – Go to the Record tab. – Click Record under the Audio section. – Use the Pause button to temporarily halt the recording and the Stop button to end the recording.
Yes, you can annotate slides during a recording: – Enter recording mode. – Use the Pen or Highlighter tool from the toolbar to annotate slides. – Other tools include the Laser pointer and Eraser.
To enable your microphone: – Unmute the mic from the audio icon on top. – Use the CTRL+M hotkey or click the three dots (More options for the recording menu). – Select Microphone to choose the audio device for recording.
To record yourself presenting: – Enable the camera during the recording session by toggling the camera icon on top. – Use the CTRL+K hotkey or access the camera option via the three dots from the top menu.
Cameo allows you to insert a video recording into a slide: – Go to Insert > Video > Cameo. – Record a video message that can be played during a presentation session. – Customize the camera shape, style, and border, and add effects using the Camera Format options.
To save a recording: – Click Export after completing your recording. – Customize your recording settings via Customize Export or continue the process via Export Video. – Choose the desired output quality (Ultra HD, Full HD, HD, or Standard). – Select and preview timings and narrations if needed. – Export the presentation to a video format.
Yes, you can edit the recording settings before exporting: – Use the Customize Export option. – Adjust output quality and other settings as needed. – Preview timings and narrations to ensure everything is as desired.
Yes, you can record a screencast: – Go to the Record tab and select Screen Recording. – Choose the area you wish to record. – Click Record or use the Windows+SHIFT+R hotkey to start recording. – Click Pause to temporarily halt the recording and Stop or use the Windows+SHIFT+Q hotkey to end the session.
Recording a PowerPoint presentation can provide a record of the session, allow you to share it with those who could not attend, and create tutorials or instructional videos.
Final Words
Recording a PowerPoint presentation can provide a record of a session that might be required for further sharing. The best way to record a presentation is to ensure that your slides aren’t visually overpowering, your audio is clear and audible, and if using a camera, the cam input isn’t hazy, grainy, or too dark.
Once you are familiar with how to record a presentation on PowerPoint, it might take a bit of practice to make your video recording look professional and crisp. It’s best to practice your sessions before recording them until you can seamlessly record presentation decks. Alternatively, check our article about how to insert a video into PowerPoint .
Like this article? Please share
PowerPoint Addins, PowerPoint Tips, Presentation Tips, Presentations, Screencasts Filed under PowerPoint Tutorials
Related Articles
Filed under Google Slides Tutorials • December 10th, 2024
How to Record a Presentation on Google Slides
Create powerful educational content by learning how to record a presentation on Google Slides. Ideal for webinars, lessons and more.

Filed under Business • November 18th, 2024
Fireside Chat: How it can Effectively Replace a Conventional Presentation
Learn about a creative method to hold meetings that can allow a much more closer relation with the audience. The Fireside Chat allows innovative formats for presentations and group gatherings.
Filed under Design , PowerPoint Tutorials • November 15th, 2024
20 Best PowerPoint Fonts to Make Your Presentation Stand Out in 2025
Creating custom presentation slides from scratch is no easy feat, especially if you struggle to find proper font combinations. Discover the best PowerPoint fonts with this guide.
One Response to “How to Record a Presentation in PowerPoint”
How do I generate webcam option in PowerPoint 2016 ?
Leave a Reply

COMMENTS
Open your PowerPoint file, go to the Recording tab, and select “Record Slide Show” on the ribbon to start recording. Check and make sure your microphone and webcam (if using) are recording properly by selecting the small microphone and video camera icons at the bottom right of the recording screen. Select the red “Record” button at the ...
Record your presentation. To launch Recording Studio, select the Record button in the top right corner or select Record > From Beginning or From Current Slide Pro Tip: Want to personalize your camera feed to go with your slide content? Create your slide with cameo before recording. Select Recording > Cameo and then select Camera format to style ...
Recordings are added to the presentation on a per-slide basis. If you want to change a recording, you can re-record one or more slides. You can rearrange the order of slides in a recorded presentation without having to re-record anything. This also means it's easy to pause for a break while recording a presentation.
To record from a specific slide, go to it, and then select Record. Note: Narration isn't recorded while the transition between slides happens, so pause during a transition, then resume speaking. Manage narration and timings
Recording a presentation in PowerPoint enables you to capture voice narration, slide timings, and more. Here’s a step-by-step guide on how to do it: Open the PowerPoint presentation you want to record. Navigate to the “Slide Show” tab in the PowerPoint toolbar. Click on “Record Slide Show” in the Set Up group.
Jun 3, 2024 · Hit Record to start the recording. Record a PowerPoint Presentation Screen Recording in PowerPoint. If you initiate screen recording in PowerPoint, you can start recording a screencast by selecting the area you wish to record. This is similar to recording a PowerPoint presentation as a video, with the added advantage of recording other parts of ...